Quantcast
Channel: Fedora People
Viewing all 29894 articles
Browse latest View live

Fedora Magazine: Bond WiFi and Ethernet for easier networking mobility

$
0
0

Sometimes one network interface isn’t enough. Network bonding allows multiple network connections to act together with a single logical interface. You might do this because you want more bandwidth than a single connection can handle. Or maybe you want to switch back and forth between your wired and wireless networks without losing your network connection.

The latter applies to me. One of the benefits to working from home is that when the weather is nice, it’s enjoyable to work from a sunny deck instead of inside. But every time I did that, I lost my network connections. IRC, SSH, VPN — everything goes away, at least for a moment while some clients reconnect. This article describes how I set up network bonding on my Fedora 30 laptop to seamlessly move from the wired connection my laptop dock to a WiFi connection.

In Linux, interface bonding is handled by the bonding kernel module. Fedora does not ship with this enabled by default, but it is included in the kernel-core package. This means that enabling interface bonding is only a command away:

sudo modprobe bonding

Note that this will only have effect until you reboot. To permanently enable interface bonding, create a file called bonding.conf in the /etc/modules-load.d directory that contains only the word “bonding”.

Now that you have bonding enabled, it’s time to create the bonded interface. First, you must get the names of the interfaces you want to bond. To list the available interfaces, run:

sudo nmcli device status

You will see output that looks like this:

DEVICE          TYPE      STATE         CONNECTION         
enp12s0u1       ethernet  connected     Wired connection 1
tun0            tun       connected     tun0               
virbr0          bridge    connected     virbr0             
wlp2s0          wifi      disconnected  --      
p2p-dev-wlp2s0  wifi-p2p disconnected  --      
enp0s31f6       ethernet  unavailable   --      
lo              loopback  unmanaged     --                 
virbr0-nic      tun       unmanaged     --       

In this case, there are two (wired) Ethernet interfaces available. enp12s0u1 is on a laptop docking station, and you can tell that it’s connected from the STATE column. The other, enp0s31f6, is the built-in port in the laptop. There is also a WiFi connection called wlp2s0. enp12s0u1 and wlp2s0 are the two interfaces we’re interested in here. (Note that it’s not necessary for this exercise to understand how network devices are named, but if you’re interested you can see the systemd.net-naming-scheme man page.)

The first step is to create the bonded interface:

sudo nmcli connection add type bond ifname bond0 con-name bond0

In this example, the bonded interface is named bond0. The “con-name bond0” sets the connection name to bond0; leaving this off would result in a connection named bond-bond0. You can also set the connection name to something more human-friendly, like “Docking station bond” or “Ben”

The next step is to add the interfaces to the bonded interface:

sudo nmcli connection add type ethernet ifname enp12s0u1 master bond0 con-name bond-ethernet
sudo nmcli connection add type wifi ifname wlp2s0 master bond0 ssid Cotton con-name bond-wifi

As above, the connection name is specified to be more descriptive. Be sure to replace enp12s0u1 and wlp2s0 with the appropriate interface names on your system. For the WiFi interface, use your own network name (SSID) where I use “Cotton”. If your WiFi connection has a password (and of course it does!), you’ll need to add that to the configuration, too. The following assumes you’re using WPA2-PSK authentication

sudo nmcli connection modify bond-wifi wifi-sec.key-mgmt wpa-psk
sudo nmcli connection edit bond-wif

The second command will bring you into the interactive editor where you can enter your password without it being logged in your shell history. Enter the following, replacing password with your actual password

set wifi-sec.psk password
save
quit

Now you’re ready to start your bonded interface and the secondary interfaces you created

sudo nmcli connection up bond0
sudo nmcli connection up bond-ethernet
sudo nmcli connection up bond-wifi

You should now be able to disconnect your wired or wireless connections without losing your network connections.

A caveat: using other WiFi networks

This configuration works well when moving around on the specified WiFi network, but when away from this network, the SSID used in the bond is not available. Theoretically, one could add an interface to the bond for every WiFi connection used, but that doesn’t seem reasonable. Instead, you can disable the bonded interface:

sudo nmcli connection down bond0

When back on the defined WiFi network, simply start the bonded interface as above.

Fine-tuning your bond

By default, the bonded interface uses the “load balancing (round-robin)” mode. This spreads the load equally across the interfaces. But if you have a wired and a wireless connection, you may want to prefer the wired connection. The “active-backup” mode enables this. You can specify the mode and primary interface when you are creating the interface, or afterward using this command (the bonded interface should be down):

sudo nmcli connection modify bond0 +bond.options "mode=active-backup,primary=enp12s0u1"

The kernel documentation has much more information about bonding options.


Peter Hutterer: libinput's new thumb detection code

$
0
0

The average user has approximately one thumb per hand. That thumb comes in handy for a number of touchpad interactions. For example, moving the cursor with the index finger and clicking a button with the thumb. On so-called Clickpads we don't have separate buttons though. The touchpad itself acts as a button and software decides whether it's a left, right, or middle click by counting fingers and/or finger locations. Hence the need for thumb detection, because you may have two fingers on the touchpad (usually right click) but if those are the index and thumb, then really, it's just a single finger click.

libinput has had some thumb detection since the early days when we were still hand-carving bits with stone tools. But it was quite simplistic, as the old documentation illustrates: two zones on the touchpad, a touch started in the lower zone was always a thumb. Where a touch started in the upper thumb area, a timeout and movement thresholds would decide whether it was a thumb. Internally, the thumb states were, Schrödinger-esque, "NO", "YES", and "MAYBE". On top of that, we also had speed-based thumb detection - where a finger was moving fast enough, a new touch would always default to being a thumb. On the grounds that you have no business dropping fingers in the middle of a fast interaction. Such a simplistic approach worked well enough for a bunch of use-cases but failed gloriously in other cases.

Thanks to Matt Mayfields' work, we now have a much more sophisticated thumb detection algorithm. The speed detection is still there but it better accounts for pinch gestures and two-finger scrolling. The exclusion zones are still there but less final about the state of the touch, a thumb can escape that "jail" and contribute to pointer motion where necessary. The new documentation has a bit of a general overview. A requirement for well-working thumb detection however is that your device has the required (device-specific) thresholds set up. So go over to the debugging thumb thresholds documentation and start figuring out your device's thresholds.

As usual, if you notice any issues with the new code please let us know, ideally before the 1.14 release.

Hernan Vivani: Move a Linux running process to a screen shell session

$
0
0

Use case:

  • You just started a process (i.e. compile, copy, etc).
  • You noticed it will take much longer than expected to finish.
  • You cannot abort or risk the process to get aborted due to the current shell session finishing.
  • It would be ideal to have this process on ‘screen’ to have it running on backgroud.

We can move it to a screen session with the following steps:

  1. Suspend the process
    1. press Ctrl+Z
  2. Resume the process in the background
    1. bg
  3. Disown the process
    1. disown %1
  4. Launch a screen session
    1. screen
  5. Find the PID of the process
    1. pgrep myappname
  6. Use reptyr to take over the process
    1. reptyr 1234


Note: at the moment of writing this, reptyr is not available on any Fedore/Redhat repo. We’ll need to compile:

$ git clone https://github.com/nelhage/reptyr.git
$ cd reptyr/
$ make
$ sudo make install


nmilosev: Compling ARM stuff without an ARM board / Build PyTorch for the Raspberry Pi

$
0
0

compiling.png

I am in the process of building a self-driving RC car. It’s a fun process full of discovery (I hate it already). Once it is finished I hope to write a longer article here about what I learned so stay tuned!

While the electronics stuff was difficult for me (fingers still burnt from soldering) I hoped that the computer vision stuff would be easier. Right? Right? Well no.

Neural network inference on small devices #

To be clear I didn’t expect to train my CNN on the Raspberry Pi that I have (its revision 2, with added USB WiFi dongle and USB webcam) but I wanted to do some inference on a model that I can train on my other computers.

I love using PyTorch and I use it for all my projects/work/research. Simply put it’s fantastic software.

Problem #1 - PyTorch doesn’t have official ARMv7 or ARMv8 builds. #

While you can get PyTorch if you have NVIDIA Jetson hardware, there are no builds for other generic boards. Insert sad emoji.

Problem #2 - ONNX, no real options #

I had the idea to export my trained model to ONNX (Open Neural Network eXchange format), but then what.

There are two projects:

  1. Microsoft’s ONNX Runtime - doesn’t support RPi2
  2. Snips Tract - Seems super-cool but Rust underneath (nothing against Rust, just not familiar)

So the only solution was: Build PyTorch from source.

“When your build takes two days you have time to think about life” - Anonymous programmer 2019. #

The PyTorch build process is fantastically simple. You get the code and run a single command. It’s robust and I used it many times before. So I jumped right in, it can’t take that long, yeah? NOP.

On my Raspberry Pi 2, with a decent SD card (Kingston UHS1 16GB) the build took 36 and a bit hours. Yes you read that correctly. Not 3.6 hours. Thirty six hours. While it ran, during these 36 hours I had a lot of down time. So I wondered how to do it quicker.

Option 1 - Cross compilation #

Cross compilation (or witchcraft in software development circles) is a process where you can build software for some architecture on another architecture. So here I wanted to build for ARM on a standard x86_64 machine. It’s complicated and difficult, always. Even though it was my first thought, I then discovered on the PyTorch Github issues, that it is not supported.

Option 2 - What about emulation #

This seems reasonable. You emulate generic ARM or ARMv8 board and build on it. QEMU/libvirt can emulate ARM just fine and there are clear instructions on how to achieve it. For example Fedora Wiki (I am using Fedora 30 both on RPi and my build machine) has a short guide on how to do it. Here is the link.

I tried this, and to be fair it worked fine. But it was slow. Almost unusably slow.

Option 3 - Witchcraft, sort of #

Remember cross compilation? I ran into an article which explains this weird setup for building ARM software. It is amazing. Basically there is a qemu-user package that allows you chroot into a rootFS of a different architecture with very little performance loss (!!!). Pair this with DNF’s feature to make a rootfs of any architecture, and you got something immensely powerful. Not just for building Python packages, for building anything for ARM or ARMv8 (aarch64 as it is called by DNF).

But then I read the last line. This was just a proposal.

So I went down the rabbit hole and followed the bug reports. All of them seemed closed. Could this feature work already? The answer was: YES!

Building PyTorch for the Raspberry Pi boards #

Once I discovered qemu-user chroot thingy, everything clicked.

So here we go, this is how to do it.

We need qemu and qemu-user packages. Virt manager is optional but nice to have.

sudo dnf install qemu-system-arm qemu-user-static virt-manager

We now need the rootfs, which is a single-liner

sudo dnf install --releasever=30 --installroot=/tmp/F30ARM --forcearch=armv7hl --repo=fedora --repo=updates systemd passwd dnf fedora-release vim-minimal openblas-devel blas-devel m4 cmake python3-Cython python3-devel python3-yaml python3-setuptools python3-numpy python3-cffi python3-wheel gcc-c++ tar gcc git make tmux -y

This will install a ARM rootfs to your /tmp directory along with everything you need to build PyTorch. Yes, it is that easy.

Let’s chroot

sudo chroot /tmp/F30ARM

Welcome to your “ARM board”, verify your kernel arch:

bash-5.0# uname -a
Linux toshiba-x70-a 5.1.12-300.fc30.x86_64 #1 SMP Wed Jun 19 15:19:49 UTC 2019 armv7l armv7l armv7l GNU/Linux

So cool, isn’t it? Some things are broken, but easy to fix. Mainly network and DNF wrongly detects your arch.

# Fix for 1691430
sed -i "s/'armv7hnl', 'armv8hl'/'armv7hnl', 'armv7hcnl', 'armv8hl'/" /usr/lib/python3.7/site-packages/dnf/rpm/__init__.py
alias dnf='dnf --releasever=30 --forcearch=armv7hl --repo=fedora --repo=updates'

# Fixes for default python and network
alias python=python3
echo 'nameserver 8.8.8.8' > /etc/resolv.conf

Your configuration is now complete and you have a working emulated ARM board.

Get PyTorch source:

git clone https://github.com/pytorch/pytorch --recursive
git checkout v1.1.0 # optional, you can build master if you are brave
git submodule update --init --recursive

Since we are building for a Raspberry Pi we want to disable CUDA, MKL etc.

export NO_CUDA=1
export NO_DISTRIBUTED=1
export NO_MKLDNN=1 
export NO_NNPACK=1
export NO_QNNPACK=1

All ready, build!

python setup.py bdist_wheel

Performance #

The RPi2 took 36+ hours. This? Under two. My laptop isn’t that new and I guess you can do it even faster with a faster CPU.

Conclusion #

Building for ARM shouldn’t be done on a board. There are probably some exceptions to the rule, but you really should consider the way explained here. It’s faster, reproducible and easy. Fedora works remarkably well for this (as for all other things, hehe) both on the device and on the build system.

Let me know how it goes for you.

Oh, and if you just stumbled on this page on Google wanting a wheel/.whl of PyTorch for your RPi2, here you go. To build for RPi3 and ARMv8 just replace every armv7hl in this post with aarch64 and you should be fine. :)

Image credit: https://xkcd.com/303/

Remi Collet: QElectroTech version 0.70

$
0
0

RPM of QElectroTech version 0.70, an application to design electric diagrams, are available in remi for Fedora and Enterprise Linux 7.

A bit more than 1 year after the version 0.60 release, the project have just released a new major version of their electric diagrams editor.

Official web site : http://qelectrotech.org/ .

Installation by YUM :

yum --enablerepo=remi install qelectrotech

RPM (version 0.70-1) are available for Fedora ≥ 28 and Enterprise Linux 7 (RHEL, CentOS, ...)

Updates are also on the road to official repositories

Notice :a Copr / Qelectrotech repository also exists, which provides "development" versions (0.7-dev for now).

Remi Collet: PHP version 7.2.21RC1 and 7.3.8RC1

$
0
0

Release Candidate versions are available in testing repository for Fedora and Enterprise Linux (RHEL / CentOS) to allow more people to test them. They are available as Software Collections, for a parallel installation, perfect solution for such tests (for x86_64 only), and also as base packages.

RPM of PHP version 7.387RC1 are available as SCL in remi-test repository and as base packages in the remi-test repository for Fedora 30 orremi-php73-test repository for Fedora 28-29 and Enterprise Linux.

RPM of PHP version 7.2.20RC1 are available as SCL in remi-test repository and as base packages in the remi-test repository for Fedora 28-29 or remi-php72-test repository for Enterprise Linux.


emblem-notice-24.pngPHP version 7.1 is now in security mode only, so no more RC will be released.

emblem-notice-24.pngInstallation : read the Repository configuration and choose your version.

Parallel installation of version 7.3 as Software Collection:

yum --enablerepo=remi-test install php73

Parallel installation of version 7.2 as Software Collection:

yum --enablerepo=remi-test install php72

Update of system version 7.3:

yum --enablerepo=remi-php73,remi-php73-test update php\*

or, the modular way (Fedora and RHEL 8):

dnf module enable php:remi-7.3
dnf --enablerepo=remi-modular-test update php\*

Update of system version 7.2:

yum --enablerepo=remi-php72,remi-php72-test update php\*

or, the modular way (Fedora and RHEL 8):

dnf module enable php:remi-7.2
dnf --enablerepo=remi-modular-test update php\*

Notice: version 7.3.8RC1 in Fedora rawhide for QA.

emblem-notice-24.pngEL-7 packages are built using RHEL-7.6.

emblem-notice-24.pngPackages of 7.4.0alpha3 are also available as a Software Collections.

emblem-notice-24.pngRC version is usually the same as the final version (no change accepted after RC, exception for security fix).

Software Collections (php72, php73)

Base packages (php)

Peter Czanik: Building blocks of syslog-ng

$
0
0

Recently I gave a syslog-ng introductory workshop at Pass the SALT conference in Lille, France. I got a lot of positive feedback, so I decided to turn all that feedback into a blog post. Naturally, I shortened and simplified it, but still managed to get enough material for multiple blog posts.

This one gives you an overview of syslog-ng, its major features and an introduction to its configuration.

What is logging & syslog-ng?

Let’s start from the very beginning. Logging is the recording of events on a computer. And what is syslog-ng? It’s an enhanced logging daemon with a focus on portability and high-performance central log collection. It was originally developed in C.

Why is central logging so important? There are three major reasons:

  • Ease of use: you have only one location to check for your log messages instead of many.

  • Availability: logs are available even when the sender machine is unreachable.

  • Security: logs are often deleted or modified once a computer is breached. Logs collected on the central syslog-ng server, on the other hand, can be used to reconstruct how the machine was compromised.

There are four major roles of syslog-ng: collecting, processing, filtering, and storing (or forwarding) log messages.

The first role is collecting, where syslog-ng can collect system and application logs together. These two can provide useful contextual information for either side. Many platform-specific log sources are supported (for example, collecting system logs from /dev/log, the Systemd Journal or Sun Streams). As a central log collector, syslog-ng supports both the legacy/BSD (RFC 3164) and the new (RFC 5424) syslog protocols over UDP, TCP and encrypted connections. It can also collect logs or any kinds of text data through files, sockets, pipes and even application output. The Python source serves as a Jolly Joker: you can implement an HTTP server (similar to Splunk HEC), fetch logs from Amazon Cloudwatch, and implement a Kafka source, to mention only a few possibilities..

The second role is processing, which covers many different possibilities. For example, syslog-ng can classify, normalize, and structure logs with built-in parsers. It can rewrite log messages ( we aren’t talking about falsifying log messages here, but anonimization as required by compliance regulations, for example). It can also enrich log messages using GeoIP, or create additional name-value pairs based on message content. You can use templates to reformat log messages, as required by a specific destination (for example, you can use the JSON template function with Elasticsearch). Using the Python parser, you can do any of the above, and even filtering.

The third role is filtering, which has two main uses. The first one is, discarding surplus log messages, like debug level messages, for example. The second one is message routing: making sure that a given set of logs reaches the right destination (for example, authentication-related messages reach the SIEM). There are many possibilities, as message routing can be based on message parameters or content, using many different filtering functions. Best of all: any of these can be combined using Boolean operators.

The fourth role is storage. Traditionally, syslog-ng stored log messages to flat files, or forwarded them to a central syslog-ng server using one of the syslog protocols and stored them there to flat files. Over the years, an SQL destination, then different big-data destinations (Hadoop, Kafka, Elasticsearch), message queuing (like AMQP or STOMP), different logging as a service providers, and many other features were added. Nowadays you can also write your own destinations in Python or Java.

Log messages

If you take a look at your /var/log directory, where log messages are normally stored on a Linux/UNIX system, you will see that most log messages have the following format: date + hostname + text. For example, observe this ssh login message:

Mar 11 13:37:56 linux-6965 sshd[4547]: Accepted keyboard-interactive/pam for root from 127.0.0.1 port 46048 ssh2

As you can see, the text part is an almost complete English sentence with some variable parts in it. It is pretty easy to read for a human. However, as each application produces different messages, it is quite difficult to create reports and alerts based on these messages.

There is a solution for this problem: structured logging. Instead of free-form text messages, in this case events are described using name-value pairs. For example, an ssh login can be described with the following name-value pairs:

app=sshd user=root source_ip=192.168.123.45

The good news is that syslog-ng was built around name-value pairs right from the beginning, as both advanced filtering and templates required syslog header data to be parsed and available as name-value pairs. Parsers in syslog-ng can turn unstructured, and even some structured data (CSV, JSON, etc.) into name-value pairs as well.

Configuration

Configuring syslog-ng is simple and logical, even if it does not look so at first sight. My initial advice: Don’t panic! The syslog-ng configuration has a pipeline model. There are many different building blocks (like sources, destinations, filters and others), and all of these can be connected in pipelines using log statements.

By default, syslog-ng usually looks for its configuration in /etc/syslog-ng/syslog-ng.conf (configurable at compile time). Here you can find a very simple syslog-ng configuration showing you all the mandatory (and even some optional) building blocks:

@version:3.21
@include "scl.conf"

# this is a comment :)

options {flush_lines (0); keep_hostname (yes);};

source s_sys { system(); internal();};
destination d_mesg { file("/var/log/messages"); };
filter f_default { level(info..emerg) and not (facility(mail)); };

log { source(s_sys); filter(f_default); destination(d_mesg); };

The configuration always starts with a version number declaration. It helps syslog-ng to figure out what your original intention with the configuration was and also warns you if there was an important change in syslog-ng internals.

You can include other configuration files from the main syslog-ng configuration. The one included here is an important one: it includes the syslog-ng configuration library. It will be discussed later in depth. For now, it is enough to know that many syslog-ng features are actually defined there, including the Elasticsearch destination.

You can place comments in your syslog-ng configuration, which helps structure the configuration and remind you about your decisions and workarounds when you need to modify the configuration later.

The use of global options helps you make your configuration shorter and easier to maintain. Most settings here can be overridden later in the configuration. For example flush_lines() defines how many messages are sent to a destination at the same time. A larger value adds latency, but better performance and lower resource usage as well. Zero is a safe choice of value for most logs on a low traffic server, as it writes all logs to disk as soon as they arrive. On the other hand, if you have a busy mail server on that host, you might want to override this value for the mail logs only. Then later, when your server becomes busy, you can easily raise the value for all of your logs.

The next three lines are the actual building blocks. Two of these are mandatory: the source and the destination (as you need to collect logs and store them somewhere). The filter is optional but useful and highly recommended.

  • A source is a named collection of source drivers. In this case, its name is s_sys, and it is using the system() and internal() sources. The first one collects from local, platform-specific log sources, while the second one collects messages generated by syslog-ng.

  • A destination is a named collection of destination drivers. In this case, its name is d_mesg, and it stores files into a flat file called /var/log/messages.

  • A filter is a named collection of filter functions. You can have a single filter function or a collection of filter functions connected using Boolean operators. Here we have a function for discarding debug level messages and another one for finding facility mail.

There are a few more building blocks (parsers, rewrites and others) not shown here. They will be introduced later.

Finally, there is a log statement connecting all these building blocks. Here you refer to the different building blocks by their names. Naturally, in a real configuration you will have several of these building blocks to refer to, not only one of each. Unless you are machine generating a complex configuration, you do not have to count the number of items in your configuration carefully.

SCL: syslog-ng configuration library

The syslog-ng configuration library (SCL) contains a number of ready-to-use configuration snippets. From the user’s point of view, they are no different from any other syslog-ng drivers. For example, the new elasticsearch-http() destination driver also originates from here.

Application Adapters are a set of parsers included in SCL that automatically try to parse any log messages arriving through the system() source. These parsers turn incoming log messages into a set of name-value pairs. The names for these name-value pairs, containing extra information, start with a dot to differentiate them from name-value pairs created by the user. For example, names for values parsed from sudo logs start with the .sudo. prefix.

This also means that unless you really know what you are doing, you should include the syslog-ng configuration library from your syslog-ng.conf. If you do not do that, many of the documented features of syslog-ng will stop working for you.

As you have already seen it in the sample configuration, you can enable SCL with the following line:

@include "scl.conf"

Networking

One of the most important features of syslog-ng is central log collection. You can use either the legacy or the new syslog protocols to collect logs centrally over the network. The machines sending the logs are called clients, while those on the receiving end are called servers. There is a lesser known, but at least equally, if not even more, important variant as well: the relays. On larger networks (or even smaller networks with multiple locations) relays are placed between clients and servers. This makes your logging infrastructure hierarchical with one or more levels of relays.

Whyuse relays? There are three major reasons:

  • you can collect UDP logs as close to the source as possible

  • you can distribute processing of log messages

  • you can secure your infrastructure: have a relay for each department or physical location, so logs can be sent from clients in real-time even if the central server is inaccessible

Macros & templates

As a syslog message arrives, syslog-ng automatically parses it. Most macros or name-value pairs are variables defined by syslog-ng based on the results of parsing. There are some macros that do not come from the parsing directly, for example the date and time a message was received (as opposed to the value stored in the message), or from enrichment, like GeoIP.

By default, messages are parsed as legacy syslog, but by using flags you can change this to new syslog (flags(syslog-protocol)) or you can even disable parsing completely (flags(no-parse)). In the latter case the whole incoming message is stored into the MESSAGE macro.

Name-value pairs or macros have many uses. One of these uses is in templates. By using templates you can change the format of how messages are stored, (for example, use ISODATE instead of the traditional date format):

template t_syslog {
    template("$ISODATE $HOST $MSG\n");
};
destination d_syslog {
    file("/var/log/syslog" template(t_syslog));
};

Another use is making file names variable. This way you can store logs coming from different hosts into different files or implement log rotation by storing files into directories and files based on the current year, month and day. An external script can delete files older than required to keep due to compliance or other reasons.

destination d_messages {
    file("/var/log/$R_YEAR/$R_MONTH/$HOST_$R_DAY.log" create_dirs(yes));
};

Filters & if/else statements

By using filters you can fine-tune which messages can reach a given destination. You can combine multiple filter functions using Boolean operators in a single filter, and you can use multiple filters in a log path. Filters are declared similarly to any other building blocks: you have to name them and then use one more filter function combined with Boolean operators inside the filter. Here is the relevant part of the example configuration from above:

filter f_default { level(info..emerg) and not (facility(mail)); };

The level() filter function lets all messages through, except for those from debug level. The second one selects all messages with facility mail. The two filter functions are connected with a not operator, so in the end all debug level and all facility mail messages are discarded by this filter.

There are many more filters. The match() filter operates on the message content and there are many more that operate on different values parsed from the message headers. From the security point of view, the inlist() filter might be interesting. This filter can compare a field with a list of values (for example, it can compare IP addresses extracted from firewall logs with a list of malware command & control IP addresses).

Conditional expressions in the log path make using the results of filtering easier. What is possible now by using simple if / else statements used to require complex configuration. You can use conditional expressions with similar blocks within the log path:

if (filter()) { do this }; else { do that };

It can be used, for example, to apply different parsers to different log messages or to save a subset of log messages to a separate destination.

Below you can find a simplified example, showing the log statement only:

log {
    source(s_sys);
    filter(f_sudo);
    if (match("czanik" value(".sudo.SUBJECT"))) {
        destination { file("/var/log/sudo_filtered"); };
    };
    destination(d_sudoall);
};

The log statement in the example above collects logs from a source called s_sys. The next filter, referred from the log path, keeps sudo logs only. Recent versions of syslog-ng automatically parse sudo messages. The if statement here uses the results of parsing, and writes any log messages where the user name (stored in the .sudo.SUBJECT name-value pair) equals to my user name to a separate file. Finally, all sudo logs are stored to a log file.

Parsing

Parsers of syslog-ng can structure, classify and normalize log messages. There are multiple advantages of parsing:

  • instead of the whole message, only the relevant parts are stored

  • more precise filtering (alerting)

  • more precise searches in (no)SQL databases

By default, syslog-ng treats the message part of logs as strings even if the message part contains structured data. You have to parse the message parts in order to turn them into name-value pairs. The advantages listed above can only be used once you have turned the message into name-value pairs by using the parsers of syslog-ng..

One of the earliest parsers of syslog-ng is the PatternDB parser. This parser can extract useful information from unstructured log messages into name-value pairs. It can also add status fields based on the message text and classify messages (like LogCheck). The downside of PatternDB is that you need to know your log messages in advance and describe them in an XML database. It takes time and effort, and while some example log messages do exist, for your most important log messages you most likely need to create the XML yourself.

For example, in case of an ssh login failure the name-value pairs created by PatternDB could be:

  • parsed directly from the message: app=sshd, user=root, source_ip=192.168.123.45

  • added, based on the message content: action=login, status=failure

  • classified as “violation” in the end.

JSON is becoming very popular recently, even for log messages. The JSON parser of syslog-ng can turn JSON logs into name-value pairs.

The CSV parser can turn any kind of columnar log messages into name-value pairs. A popular example was the Apache web server access log.

If you are into IT security, you will most likely use the key=value parser a lot, as iptables and most firewalls store their log messages in this format.

There are many more lesser known parsers in syslog-ng as well. You can parse XML logs, logs from the Linux Audit subsystem, and even custom date formats, by using templates.

SCL contains many parsers that combine multiple parsers into a single one to parse more complex log messages. There are parsers for Apache access logs that also parse the date from the logs. In addition, they can also interpret most Cisco logs resembling syslog messages.

Enriching messages

You can create additional name-value pairs based on the message content. PatternDB, already discussed among the parsers, can not only parse messages, but can also create name-value pairs based on the message content.

The GeoIP parser can help you find the geo-location of IP addresses. The new geoip2() parser can show you more than just the country or longitude/latitude information: it can display the continent, the county, and even the city as well, in multiple languages. It can help you spot anomalies or display locations on a map.

By using add-contextual-data(), you can enrich log messages from a CSV file. You can add, for example, host role or contact person information, based on the host name. This way you have to spend less time on finding extra information, and it can also help you create more accurate dashboards and alerts.

parser p_kv {kv-parser(prefix("kv.")); };

parser p_geoip2 { geoip2( "${kv.SRC}", prefix( "geoip2." ) database( "/usr/share/GeoIP/GeoLite2-City.mmdb" ) ); };

source s_tcp { tcp(port(514)); };

destination d_file {
  file("/var/log/fromnet" template("$(format-json --scope rfc5424
  --scope dot-nv-pairs --rekey .* --shift 1 --scope nv-pairs
  --exclude DATE --key ISODATE @timestamp=${ISODATE})\n\n") );
};

log {
  source(s_tcp);
  parser(p_kv);
  parser(p_geoip2);
  destination(d_file);
};

The configuration above collects log messages from a firewall using the legacy syslog protocol on a TCP port. The incoming logs are first parsed with a key=value parser (using a prefix to avoid colliding macro names). The geoip2() parser takes the source IP address as input (stored in kv.SRC) and stores location data under a different prefix. By default, logs written to disk do not include the extracted name-value pairs. This is why logs are written here to a file using the JSON template function, which writes all syslog-related macros and any extracted name-value pairs into the file. Name-initial dots are removed from names and date is used as expected by Elasticsearch. The only difference is that there are two line feeds at the end, to make the file easier to read.


If you have questions or comments related to syslog-ng, do not hesitate to contact us. You can reach us by email or you can even chat with us. For a long list of possibilities, check our contact page at https://syslog-ng.org/contact-us/. On Twitter I am available as @Pczanik.


Luigi Votta: Text install's Revenge!

$
0
0
To install Fedora 30 in text mode,
selecting what you need and prefer, try this!

Download a net-install iso
When grub loads, insert inst.text at end of kernel line.


Fedora Community Blog: Contribute at the Fedora Test Week for kernel 5.2

$
0
0
Fedora 30 Kernel 5.2Test Day

The kernel team is working on final integration for kernel 5.2. This version was just recently released, and will arrive soon in Fedora. This version has many security fixes included. As a result, the Fedora kernel and QA teams have organized a test week from Monday, July 22, 2019 through Monday, July 29, 2019. Refer to the wiki page for links to the test images you’ll need to participate. Read below for details.

How does a test week work?

A test day/week is an event where anyone can help make sure changes in Fedora work well in an upcoming release. Fedora community members often participate, and the public is welcome at these events. If you’ve never contributed before, this is a perfect way to get started.

To contribute, you only need to be able to do the following things:

  • Download test materials, which include some large files
  • Read and follow directions step by step

The wiki page for the kernel test day has a lot of good information on what and how to test. After you’ve done some testing, you can log your results in the test day web application. If you’re available on or around the day of the event, please do some testing and report your results.

Happy testing, and we hope to see you on test day.

The post Contribute at the Fedora Test Week for kernel 5.2 appeared first on Fedora Community Blog.

Carlos Jara Alva

$
0
0
FLISOL 2019
En el mes de abril se realizo el FLISOL en distintas partes de Latinoamérica. En el Perú, se realizo en pocas sedes:
En Lima, la única sede que participo fue en la Municipalidad de Pueblo Libre, en el cual la Comunidad de Fedora Peru fue invitada: https://www.facebook.com/proyectofedoraperu/


Muchas gracias por el apoyo.

Kushal Das: Setting up WKD

$
0
0

We fetch any GPG public key from the keyservers using the GPG fingerprint (or parts of it). This step is still a problematic one for most of us. As the servers may not be responding, or the key is missing (not pushed) to the server. Also, if we only have the email address, there is no easy way to download the corresponding GPG key.

Web Key Directory to rescue

The Web Key Directory comes to the picture. We use WKD to enable others to get our GPG keys for email addresses very easily. In simple terms:

The Web Key Directory is the HTTPS directory from which keys can be fetched.

Let us first see this in action:

gpg --auto-key-locate clear,wkd --locate-key mail@kushaldas.in

The above will fetch you the key for the email address, and you can also assume the person who owns the key also has access to the https://kushaldas.in server.

There are many available email clients, which will do this for you. For example Thunderbird/Enigmail 2.0 or Kmail version 5.6 onwards.

Setting up WKD for your domain

I was going through the steps mentioned in the GNUPG wiki, while weasel pointed to me to a Makefile to keep things even more straightforward.

all: update install

update:
        rm -rfv openpgpkey
        mkdir -v openpgpkey
        echo 'A85FF376759C994A8A1168D8D8219C8C43F6C5E1 mail@kushaldas.in' | /usr/lib/gnupg/gpg-wks-client -v --install-key
        chmod -v 0711 openpgpkey/kushaldas.in
        chmod -v 0711 openpgpkey/kushaldas.in/hu
        chmod -v 0644 openpgpkey/kushaldas.in/hu/*
        touch openpgpkey/kushaldas.in/policy

        ln -s kushaldas.in/hu openpgpkey/
        ln -s kushaldas.in/policy openpgpkey/

install: update
        rsync -Pravz --delete ./openpgpkey root@kushaldas.in:/usr/local/www/kushaldas.in/.well-known/

.PHONY: all update install

The above Makefile is using gpg-wks-client executable and also pushing the changes to the right directory on the server.

Email providers like protonmail already allow users to publish similar information. I hope this small Makefile will help you to set up your domain.

Fedora Magazine: Modifying Windows local accounts with Fedora and chntpw

$
0
0

I recently encountered a problem at work where a client’s Windows 10 PC lost trust to the domain. The user is an executive and the hindrance of his computer can affect real-time mission-critical tasks. He gave me 30 minutes to resolve the issue while he attended a meeting.

Needless to say, I’ve encountered this issue many times in my career. It’s an easy fix using the Windows 7/8/10 installation media to reset the Administrator password, remove the PC off the domain and rejoin it. Unfortunately it didn’t work this time. After 20 minutes of scouring the net and scanning through the Microsoft Docs with no success, I turned to my development machine running Fedora with hopes of finding a solution.

With dnf search I found a utility called chntpw:

$ dnf search windows | grep password

According to the summary, chntpw will “change passwords in Windows SAM files.”

Little did I know at the time there was more to this utility than explained in the summary. Hence, this article will go through the steps I used to successfully reset a Windows local user password using chntpw and a Fedora Workstation Live boot USB. The article will also cover some of the features of chntpw used for basic user administration.

Installation and setup

If the PC can connect to the internet after booting the live media, install chntpw from the official Fedora repository with:

$ sudo dnf install chntpw

If you’re unable to access the internet, no sweat! Fedora Workstation Live boot media has all the dependencies installed out-of-the-box, so all we need is the package. You can find the builds for your Fedora version from the Fedora Project’s Koji site. You can use another computer to download the utility and use a USB thumb drive, or other form of media to copy the package.

First and foremost we need to create the Fedora Live USB stick. If you need instructions, the article on How to make a Fedora USB stick is a great reference.

Once the key is created shut-down the Windows PC, insert the thumb drive if the USB key was created on another computer, and turn on the PC — be sure to boot from the USB drive. Once the live media boots, select “Try Fedora” and open the Terminal application.

Also, we need to mount the Windows drive to access the files. Enter the following command to view all drive partitions with an NTFS filesystem:

$ sudo blkid | grep ntfs

Most hard drives are assigned to /dev/sdaX where X is the partition number — virtual drives may be assigned to /dev/vdX, and some newer drives (like SSDs) use /dev/nvmeX. For this example the Windows C drive is assigned to /dev/sda2. To mount the drive enter:

$ sudo mount /dev/sda2 /mnt

Fedora Workstation contains the ntfs-3g and ntfsprogs packages out-of-the-box. If you’re using a spin that does not have NTFS working out of the box, you can install these two packages from the official Fedora repository with:

$ sudo dnf install ntfs-3g ntfsprogs

Once the drive is mounted, navigate to the location of the SAM file and verify that it’s there:

$ cd /mnt/Windows/System32/config
$ ls | grep SAM
SAM
SAM.LOG1
SAM.LOG2

Clearing or resetting a password

Now it’s time to get to work. The help flag -h provides everything we need to know about this utility and how to use it:

$ chntpw -h
chntpw: change password of a user in a Windows SAM file,
or invoke registry editor. Should handle both 32 and 64 bit windows and
all version from NT3.x to Win8.1
chntpw [OPTIONS] [systemfile] [securityfile] [otherreghive] […]
-h This message
-u Username or RID (0x3e9 for example) to interactively edit
-l list all users in SAM file and exit
-i Interactive Menu system
-e Registry editor. Now with full write support!
-d Enter buffer debugger instead (hex editor),
-v Be a little more verbose (for debuging)
-L For scripts, write names of changed files to /tmp/changed
-N No allocation mode. Only same length overwrites possible (very safe mode)
-E No expand mode, do not expand hive file (safe mode)

Usernames can be given as name or RID (in hex with 0x first)
See readme file on how to get to the registry files, and what they are.
Source/binary freely distributable under GPL v2 license. See README for details.
NOTE: This program is somewhat hackish! You are on your own!

Use the -l parameter to display a list of users it reads from the SAM file:

$ sudo chntpw -l SAM
chntpw version 1.00 140201, (c) Petter N Hagen
Hive name (from header): <\SystemRoot\System32\Config\SAM>
ROOT KEY at offset: 0x001020 * Subkey indexing type is: 686c
File size 65536 [10000] bytes, containing 7 pages (+ 1 headerpage)
Used for data: 346/37816 blocks/bytes, unused: 23/7016 blocks/bytes.

| RID -|---------- Username ------------| Admin? |- Lock? --|
| 01f4 | Administrator | ADMIN | dis/lock |
| 01f7 | DefaultAccount | | dis/lock |
| 03e8 | defaultuser0 | | dis/lock |
| 01f5 | Guest | | dis/lock |
| 03ea | sysadm | ADMIN | |
| 01f8 | WDAGUtilityAccount | | dis/lock |
| 03e9 | WinUser | | |

Now that we have a list of Windows users we can edit the account. Use the -u parameter followed by the username and the name of the SAM file. For this example, edit the sysadm account:

$ sudo chntpw -u sysadm SAM
chntpw version 1.00 140201, (c) Petter N Hagen
Hive name (from header): <\SystemRoot\System32\Config\SAM>
ROOT KEY at offset: 0x001020 * Subkey indexing type is: 686c
File size 65536 [10000] bytes, containing 7 pages (+ 1 headerpage)
Used for data: 346/37816 blocks/bytes, unused: 23/7016 blocks/bytes.

================= USER EDIT ====================

RID : 1002 [03ea]
Username: sysadm
fullname: SysADM
comment :
homedir :

00000220 = Administrators (which has 2 members)

Account bits: 0x0010 =
[ ] Disabled | [ ] Homedir req. | [ ] Passwd not req. |
[ ] Temp. duplicate | [X] Normal account | [ ] NMS account |
[ ] Domain trust ac | [ ] Wks trust act. | [ ] Srv trust act |
[ ] Pwd don't expir | [ ] Auto lockout | [ ] (unknown 0x08) |
[ ] (unknown 0x10) | [ ] (unknown 0x20) | [ ] (unknown 0x40) |

Failed login count: 0, while max tries is: 0
Total login count: 0

- - - User Edit Menu:
1 - Clear (blank) user password
(2 - Unlock and enable user account) [seems unlocked already]
3 - Promote user (make user an administrator)
4 - Add user to a group
5 - Remove user from a group
q - Quit editing user, back to user select
Select: [q] >

To clear the password press 1 and ENTER. If successful you will see the following message:

...
Select: [q] > 1
Password cleared!
================= USER EDIT ====================

RID : 1002 [03ea]
Username: sysadm
fullname: SysADM
comment :
homedir :

00000220 = Administrators (which has 2 members)

Account bits: 0x0010 =
[ ] Disabled | [ ] Homedir req. | [ ] Passwd not req. |
[ ] Temp. duplicate | [X] Normal account | [ ] NMS account |
[ ] Domain trust ac | [ ] Wks trust act. | [ ] Srv trust act |
[ ] Pwd don't expir | [ ] Auto lockout | [ ] (unknown 0x08) |
[ ] (unknown 0x10) | [ ] (unknown 0x20) | [ ] (unknown 0x40) |

Failed login count: 0, while max tries is: 0
Total login count: 0
** No NT MD4 hash found. This user probably has a BLANK password!
** No LANMAN hash found either. Try login with no password!
...

Verify the change by repeating:

$ sudo chntpw -l SAM
chntpw version 1.00 140201, (c) Petter N Hagen
Hive name (from header): <\SystemRoot\System32\Config\SAM>
ROOT KEY at offset: 0x001020 * Subkey indexing type is: 686c
File size 65536 [10000] bytes, containing 7 pages (+ 1 headerpage)
Used for data: 346/37816 blocks/bytes, unused: 23/7016 blocks/bytes.

| RID -|---------- Username ------------| Admin? |- Lock? --|
| 01f4 | Administrator | ADMIN | dis/lock |
| 01f7 | DefaultAccount | | dis/lock |
| 03e8 | defaultuser0 | | dis/lock |
| 01f5 | Guest | | dis/lock |
| 03ea | sysadm | ADMIN | *BLANK* |
| 01f8 | WDAGUtilityAccount | | dis/lock |
| 03e9 | WinUser | | |

...

The “Lock?” column now shows BLANK for the sysadm user. Type q to exit and y to write the changes to the SAM file. Reboot the machine into Windows and login using the account (in this case sysadm) without a password.

Features

Furthermore, chntpw can perform basic Windows user administrative tasks. It has the ability to promote the user to the administrators group, unlock accounts, view and modify group memberships, and edit the registry.

The interactive menu

chntpw has an easy-to-use interactive menu to guide you through the process. Use the -i parameter to launch the interactive menu:

$ chntpw -i SAM
chntpw version 1.00 140201, (c) Petter N Hagen
Hive name (from header): <\SystemRoot\System32\Config\SAM>
ROOT KEY at offset: 0x001020 * Subkey indexing type is: 686c
File size 65536 [10000] bytes, containing 7 pages (+ 1 headerpage)
Used for data: 346/37816 blocks/bytes, unused: 23/7016 blocks/bytes.

<>========<> chntpw Main Interactive Menu <>========<>
Loaded hives:
1 - Edit user data and passwords
2 - List groups
- - -
9 - Registry editor, now with full write support!
q - Quit (you will be asked if there is something to save)

Groups and account membership

To display a list of groups and view its members, select option 2 from the interactive menu:

...
What to do? [1] -> 2
Also list group members? [n] y
=== Group # 220 : Administrators
0 | 01f4 | Administrator |
1 | 03ea | sysadm |
=== Group # 221 : Users
0 | 0004 | NT AUTHORITY\INTERACTIVE |
1 | 000b | NT AUTHORITY\Authenticated Users |
2 | 03e8 | defaultuser0 |
3 | 03e9 | WinUser |
=== Group # 222 : Guests
0 | 01f5 | Guest |
=== Group # 223 : Power Users
...
=== Group # 247 : Device Owners

Adding the user to the administrators group

To elevate the user with administrative privileges press 1 to edit the account, then 3 to promote the user:

...
Select: [q] > 3

=== PROMOTE USER
Will add the user to the administrator group (0x220)
and to the users group (0x221). That should usually be
what is needed to log in and get administrator rights.
Also, remove the user from the guest group (0x222), since
it may forbid logins.

(To add or remove user from other groups, please other menu selections)

Note: You may get some errors if the user is already member of some
of these groups, but that is no problem.

Do it? (y/n) [n] : y

Adding to 0x220 (Administrators) …
sam_put_user_grpids: success exit
Adding to 0x221 (Users) …
sam_put_user_grpids: success exit
Removing from 0x222 (Guests) …
remove_user_from_grp: NOTE: group not in users list of groups, may mean user not member at all. Safe. Continuing.
remove_user_from_grp: NOTE: user not in groups list of users, may mean user was not member at all. Does not matter, continuing.
sam_put_user_grpids: success exit

Promotion DONE!

Editing the Windows registry

Certainly the most noteworthy, as well as the most powerful, feature of chntpw is the ability to edit the registry and write to it. Select 9 from the interactive menu:

...
What to do? [1] -> 9
Simple registry editor. ? for help.

> ?
Simple registry editor:
hive [] - list loaded hives or switch to hive number
cd - change current key
ls | dir [] - show subkeys & values,
cat | type - show key value
dpi - show decoded DigitalProductId value
hex - hexdump of value data
ck [] - Show keys class data, if it has any
nk - add key
dk - delete key (must be empty)
ed - Edit value
nv - Add value
dv - Delete value
delallv - Delete all values in current key
rdel - Recursively delete key & subkeys
ek - export key to (Windows .reg file format)
debug - enter buffer hexeditor
st [] - debug function: show struct info
q - quit

Finding help

As we saw earlier, the -h parameter allows us to quickly access a reference guide to the options available with chntpw. The man page contains detailed information and can be accessed with:

$ man chntpw

Also, if you’re interested in a more hands-on approach, spin up a virtual machine. Windows Server 2019 has an evaluation period of 180 days, and Windows Hyper-V Server 2019 is unlimited. Creating a Windows guest VM will provide the basics to modify the Administrator account for testing and learning. For help with quickly creating a guest VM refer to the article Getting started with virtualization in Gnome Boxes.

Conclusion

chntpw is a hidden gem for Linux administrators and IT professionals alike. While a nifty tool to quickly reset Windows account passwords, it can also be used to troubleshoot and modify local Windows accounts with a no-nonsense feel that delivers. This is perhaps only one such tool for solving the problem, though. If you’ve experienced this issue and have an alternative solution, feel free to put it in the comments below.

This tool, like many other “hacking” tools, holds with it an ethical responsibility. Even chntpw states:

NOTE: This program is somewhat hackish! You are on your own!

When using such programs, we should remember the three edicts outlined in the message displayed when running sudo for the first time:

  1. Respect the privacy of others.
  2. Think before you type.
  3. With great power comes great responsibility.

Photo by Silas Köhler on Unsplash,

Daniel Pocock: Codes of Conduct and Hypocrisy

$
0
0

In recent times, there has been increasing attention on all forms of abuse and violence against women.

Many types of abuse are hidden from public scrutiny. Yet there is one that is easily visible: the acid attack.

Reshma Qureshi, pictured above, was attacked by an estranged brother-in-law. He had aimed to attack her sister, his ex-wife. This reveals one of the key attributes of these attacks: they are often perpetrated by somebody who the victim trusted.

When so many other forms of abuse are hidden, why is the acid attack so visible? This is another common theme: the perpetrator is often motivated to leave lasting damage, to limit the future opportunities available to the victim. It is not about hurting the victim, it is about making sure they will be rejected by others.

It is disturbing then that we find similar characteristics in online communities. Debian and Wikimedia (beware: scandal) have both recently decided to experiment with publicly shaming, humiliating and denouncing people. In the world of technology, trust is critical. People in positions of leadership have found that a simple email to the press can be used to undermine trust in a rival, leaving a smear that will linger, like the scars intended by Qureshi's estranged brother-in-law. Here is an example:

Jackson's virtual acid attack was picked up by at least one journalist and used to create a news story.

Some people spend endless hours talking (or writing) about safety and codes of conduct, yet they seem to completely miss the point. Personally, I don't object to codes of conduct, but we have to remember that not all codes of conduct are equal. In practice, the use of codes of conduct in many free software communities today looks like this:

If you search for sample codes of conduct online, you may well find some organizations use alternative titles, such as a statement of member's rights and obligations. This reminds us that you need to have both.

When we see organizations like FSFE and Debian trying to make up excuses to explain why members can't be members of their respective legal bodies, what they are really saying is that they want the members to have less rights.

When you have obligations without rights, you end up with slavery and cult-like phenomena.

History lessons

One of the first codes of conduct may be the Magna Carta from the year 1215. Lord Denning described it as the greatest constitutional document of all times – the foundation of the freedom of the individual against the arbitrary authority of the despot.

In other words, 800 years ago in medieval England they came to the conclusion that members of a community couldn't be punished arbitrarily.

What is significant about this document is that the king himself chose to be subjected to this early code of conduct.

An example of rights

In 2016, when serious accusations of sexual misconduct were made against a volunteer who participates in multiple online communities, the Debian Account Managers sent him a threat of expulsion and gave him two days to respond.

Yet in 2018, when Chris Lamb decided to indulge in removing members from the Debian keyring, he simply did it spontaneously, using the Debian Account Managers as puppets to do his bidding. Members targetted by these politically-motivated assassinations weren't given the same two day notice period as the person facing allegations of sexual assault.

Two days hardly seems like sufficient time to respond to such allegations, especially for the member who was ambushed the week before Christmas. What if such a message was sent when he was already on vacation and didn't even receive the message until January? Nonetheless, however crude, a two day response period is a process. Chris Lamb threw that process out the window. There is something incredibly arrogant about that, a leader who doesn't need to listen to people before making such a serious decision, it is as if he thinks being Debian Project Leader is equivalent to being God.

The Universal Declaration of Human Rights, Article 10 tells us that Everyone is entitled in full equality to a fair and public hearing by an independent and impartial tribunal, in the determination of his rights and obligations. They were probably thinking about more than a two day response period when they wrote that.

Any organization seeking to have a credible code of conduct seeks to have a clause equivalent to article 10. Yet the recent scandals in Debian and Wikimedia demonstrate what happens in the absence of such clauses. As Lord Denning put it, without any process or hearing, members are faced with the arbitrary authority of the despot.

The trauma of incarceration

In her FOSDEM 2019 talk about Enforcement, Molly de Blanc has chosen pictures of a cat behind bars and a cat being squashed in a sofa.

It is abhorrent that de Blanc chose to use this imagery just three days after another member of the Debian community passed away. Locking up people (or animals) is highly abusive and not something to joke about. For example, we wouldn't joke with a photo of an animal being raped, so why is it OK to display an image of a cat behind bars?

Deaths in custody are a phenomena that is both disturbing and far too common. Debian's founder had taken his life immediately after a period of incarceration.

Virtual incarceration

The system of secretly shaming people, censoring people, demoting people and running huge lynching threads on the debian-private mailing list has many psychological similarities to incarceration.

Here is a snapshot of what happens on debian-private:

It resembles the medieval practice of locking people in the pillory or stocks and inviting the rest of the community to throw rocks and garbage at them.

How would we feel if somebody either responded to this virtual lynching with physical means, or if they took their own life or the lives of other people? In my earlier blog about secret punishments, I referred to the research published in Social Psychology of Education which found that psychological impacts of online bullying, which includes shaming, are just as harmful as the psychological impact from child abuse.

Would you want to holiday in a village that re-introduced this type of cruel punishment? It turns out, studies have also shown that witnesses to the bullying, which could include any subscribers to the debian-private mailing list, may be suffering as much or more harm than the victims.

If Debian's new leader took bullying seriously, he would roll back all decisions made through such vile processes, delete all evidence of the bullying from public mailing list archives and give a public statement to confirm that the organization failed. Instead, we see people continuing to try and justify a kangaroo court, using grievance procedures sketched on the back of a napkin.

What is leadership for?

It is generally accepted that leaders of modern organizations should act to prevent lynchings and mobbings in their organizations. Yet in recent cases in both Debian and Wikimedia, it appears that the leaders have been the instigators, using the lynching to turn opinion against their victims before there is any time to analyse evidence or give people a fair hearing.

What's more, many people have formed the impression that Molly de Blanc's talks on this subject are not only encouraging these practices but also trolling the victims. She is becoming a trauma trigger for anybody who has ever been bullied.

Looking over the debian-project mailing list since December 2018, it appears all the most abusive messages, such as the call for dirt on another member, or the public announcement that a member is on probation, have been written by people in a position of leadership or authority, past or present. These people control the infrastructure, they know the messages will reach a lot of people and they intend to preserve them publicly for eternity. That is remarkably similar to the mindset of the men who perpetrate acid attacks on women they can't control.

Therefore, if the leader of an organization repeatedly indulges himself, telling volunteers they are not real developers, has he really made them less of a developer, or has he simply become less of a leader, demoting himself to become one of the despots Lord Henning refers to?

Matthias Clasen: Pango updates

$
0
0
<header class="entry-header">I have recently spent some time on Pango again, in preparation for the Westcoast hackfest. Behdad is here, and we’ve made great progress on the first day.

</header>

My last Pango update laid out our plans for Pango. Today I’ll summarize the major changes that will be in the next Pango release, 1.44.

Unicode APIs

I had a planned to replace PangoScript by GUnicodeScript outright, but doing so caused breakage in introspection and elsewhere. So, for now, we’ve just deprecated it and recommend that everybody should use GUnicodeScript instead. We did get a registered GType for this (and other) enumerations into GObject, so the lack of a type is no longer an obstacle.

Harfbuzz passthrough

We have added an api to get a Harfbuzz font object from a PangoFont:

hb_font_t *pango_font_get_hb_font (PangoFont *f)

This makes technologies such as OpenType features or variations available to applications without adding more Pango apis in the future.

Reduced freetype dependency

Pango uses harfbuzz for getting font and glyph metrics , glyph IDs and other kinds of font information now, so we don’t need an FT_Face anymore, and pango_fc_font_lock_face() has been deprecated.

Unified shaping

We are using harfbuzz for shaping on all platforms now.  This has allowed us to drop the remaining internal uses of shape and language engines.

Unhinted rendering

Pango no longer forces glyph positions and sizes to be on integral pixel positions. This allows renderers to place glyphs on a subpixel grid. cairo master has the necessary changes to make this work.

Kevin Fenzi: Changing how we work

$
0
0

As those of you who read the https://communityblog.fedoraproject.org/state-of-the-community-platform-engineering-team/ blog know, we are looking at changing workflows and organization around in the Community Platform Engineering team (of which, I am a member). So, I thought I would share a few thoughts from my perspective and hopefully enlighten the community more on why we are changing things and what that might look like.

First, let me preface my remarks with a disclaimer: I am speaking for myself, not our entire team or anyone else in it.

So what are the reasons we are looking for change? Well, there are a number of them, some of them inter-related, but:

  • I know I spend more time on my job than any ‘normal’ person would. Thats great, but we don’t want burn out or heroic efforts all the time. It’s just not sustainable. We want to get things done more efficiently, but also have time to relax and not have tons of stress.
  • We maintain/run too many things for the number of people we have. Some of our services don’t need much attention, but even so, we have added lots of things over the years and retired very few.
  • Humans suck at multitasking. There’s been study after study that show that for the vast majority of people, it is MUCH more efficent to do one task at a time, finish it and then move on. Our team gets constant interruptions, and we currently handle them poorly.
  • It’s unclear where big projects are in our backlog. When other teams approach us with big items to do it’s hard to show them when we might work on the thing they want us to, or whats ahead of it, or what priority things have.
  • We have a lot of ‘silos’. Just the way the team has worked, one person usually takes lead on each specific application or area and knows it quite well. This however means no one else does, no one else can help, they can never win the lottery, etc.
  • Things without a ‘driver’ sometimes just languish. If there is not someone (one of our team or even a requestor) pressing a work item forward, sometimes it just never gets done. Look at some of the old tickets in the fedora-infrastructure tracker. We totally want to do many of those, but they never get someone scheduling them and doing them.
  • There’s likely more…

So, what have we done lately to help with these issues? We have been looking a lot at other similar teams and how they became more efficient. We have been looking at various of the ‘agile’ processes, although I personally do not want to cargo cult anything, if there’s a ceremony some process calls for that makes no sense for us, we should not do it.

  • We setup an ‘oncall’ person (switched weekly). This person listens for pings on IRC, tickets or emails to anyone on the team and tries to intercept and triage them. This allows the rest of the team to focus on whatever they are working on (unless the oncall person deems this serious enough to bother them). Even if you stop and tell the person you don’t have time and are busy on something else, the amount of time to swap that out and back in already makes things much worse for you. We of course will still be happy to work with people on IRC, just schedule time in advance in the associated ticket.
  • ticket or it doesn’t exist. We still are somewhat bad about this, but the idea is that every work item should be a ticket. Why? So we can keep track of the things we do, so oncall can triage them and assign priority, so people can look at tickets when they have finished a task and not been interrupted in the middle of it. So we can hand off items that are still being worked on and coordinate. So we know who is doing what. And on and on.
  • We are moving our ‘big project’ items to be handled by teams that assemble for that project. This includes a gathering info phase, priority, who does what, estimated schedule, etc. This ensures that there’s no silo (multiple people working on it), that it has a driver so it gets done and so on. Setting expectations is key.
  • We are looking to retire, outsource or hand off to community members some of the things we ‘maintain’ today. There’s a few things that just make sense to drop because they aren’t used much, or we can just point at some better one. There’s also a group of things that we could run, but we could just outsource to another company that focuses on that application and have them do it. Finally there are things we really like and want to grow, but we just don’t have any time to work on them. If we hand them off to people who are passioniate about them, hopefully they will grow much better than if we were still the bottleneck.

Finally, where are we looking at getting to?

  • We will probibly be setting up a new tracker for work (which may not mean anything to our existing trackers, we may just sync from those to the new one). This is to allow us to get lots more metrics and have a better way of tracking all this stuff. This is all still handwavy, but we will of course take input on it as we go and adjust.
  • Have an ability to look and see what everyone is working on right at a point in time.
  • Much more ‘planning ahead’ and seeing all the big projects on the list.
  • Have an ability for stakeholders to see where their thing is and who is higher priority and be able to negotiate to move things around.
  • Be able to work on single tasks to completion, then grab the next one from the backlog.
  • Be able to work “normal” amounts of time… no heroics!

I hope everyone will be patient with us as we do these things, provide honest feedback to us so we can adjust and help us get to a point where everyone is happier.


Matthias Clasen: Westcoast hackfest; GTK updates

$
0
0

After Behdad left, Christian and I turned our attention to GtkTextView, and made some progress.

Scrolling

GtkTextView is a very old widget. It started out as a port of the tk text widget, and it has not seen a lot of architectural updates over the years. A few years ago, we added a pixel cache to it, to improve its scrolling, but on a high resolution display, its still a lot of pixels to shovel around.

As we’ve moved widgets to GTK4’s rendering models, everybody avoided GtkTextView, so it was using the fallback cairo rendering path, even as we ported other text rendering in GTK to a new pango renderer which produces render nodes.

Until yesterday. We decided to just have a look at how hard it would be to switch the text view over to the new pango renderer. This went much more smoothly than we expected, and the new code is in master today.

<iframe allow="accelerometer; autoplay; encrypted-media; gyroscope; picture-in-picture" allowfullscreen="allowfullscreen" frameborder="0" height="267" src="https://www.youtube.com/embed/zDLCJCX1kL0?feature=oembed" title="Gtk 4 smooth scrolling with GPU backed textview" width="474"></iframe>

So far, this is just a straight port with no optimizations (we want to look at smarter caching of render nodes for the visible range). But it is already noticeably smoother to scroll text.

The video does not really do it justice. If you want to try for yourself, the commit is here.

Blinking

After this unexpected success, we looked for another small thing we could to make text editing in GTK feel more modern: better blinking cursors.

<video class="wp-video-shortcode" controls="controls" height="267" id="video-3230-1" preload="metadata" width="474"><source src="https://blogs.gnome.org/mclasen/files/2019/07/cursor-blinks.webm?_=1" type="video/webm">https://blogs.gnome.org/mclasen/files/2019/07/cursor-blinks.webm</video>

For the last 20 years, our cursor blinking was very simple: We turn it off, and then we turn it on again. With GTK4, it is very straightforward to do a little better, and fade the cursor in and out smoothly.

A subtle change, but it improves the experience.

Open Source Security Podcast: Episode 155 - Stealing cars and ransomware

$
0
0
Josh and Kurt talk about a new way to steal cars because a service didn't do proper background checks. We also discuss how this relates to working with criminals, such as ransomware, and what it means for the future of the ransomware industry.


<iframe allowfullscreen="" height="90" mozallowfullscreen="" msallowfullscreen="" oallowfullscreen="" scrolling="no" src="https://html5-player.libsyn.com/embed/episode/id/10588175/height/90/theme/custom/thumbnail/yes/direction/backward/render-playlist/no/custom-color/6e6a6a/" style="border: none;" webkitallowfullscreen="" width="100%"></iframe>

Show Notes


    Fedora Magazine: How to run virtual machines with virt-manager

    $
    0
    0

    In the beginning there was dual boot, it was the only way to have more than one operating system on the same laptop. At the time, it was difficult for these operating systems to be run simultaneously or interact with each other. Many years passed before it was possible, on common PCs, to run an operating system inside another through virtualization.

    Recent PCs or laptops, including moderately-priced ones, have the hardware features to run virtual machines with performance close to the physical host machine.

    Virtualization has therefore become normal, to test operating systems, as a playground for learning new techniques, to create your own home cloud, to create your own test environment and much more. This article walks you through using Virt Manager on Fedora to setup virtual machines.

    Introducing QEMU/KVM and Libvirt

    Fedora, like all other Linux systems, comes with native support for virtualization extensions. This support is given by KVM (Kernel based Virtual Machine) currently available as a kernel module.

    QEMU is a complete system emulator that works together with KVM and allows you to create virtual machines with hardware and peripherals.

    Finally libvirt is the API layer that allows you to administer the infrastructure, ie create and run virtual machines.

    The set of these three technologies, all open source, is what we’re going to install on our Fedora Workstation.

    Installation

    Step 1: install packages

    Installation is a fairly simple operation. The Fedora repository provides the “virtualization” package group that contains everything you need.

    sudo dnf install @virtualization

    Step 2: edit the libvirtd configuration

    By default the system administration is limited to the root user, if you want to enable a regular user you have to proceed as follows.

    Open the /etc/libvirt/libvirtd.conf file for editing

    sudo vi /etc/libvirt/libvirtd.conf

    Set the domain socket group ownership to libvirt

    unix_sock_group = "libvirt"

    Adjust the UNIX socket permissions for the R/W socket

    unix_sock_rw_perms = "0770"

    Step 3: start and enable the libvirtd service

    sudo systemctl start libvirtd
    sudo systemctl enable libvirtd

    Step 4: add user to group

    In order to administer libvirt with the regular user you must add the user to the libvirt group, otherwise every time you start virtual-manager you will be asked for the password for sudo.

    sudo usermod -a -G libvirt $(whoami)

    This adds the current user to the group. You must log out and log in to apply the changes.

    Getting started with virt-manager

    The libvirt system can be managed either from the command line (virsh) or via the virt-manager graphical interface. The command line can be very useful if you want to do automated provisioning of virtual machines, for example with Ansible, but in this article we will concentrate on the user-friendly graphical interface.

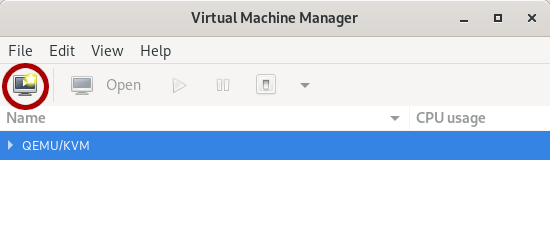
    The virt-manager interface is simple. The main form shows the list of connections including the local system connection.

    The connection settings include virtual networks and storage definition. it is possible to define multiple virtual networks and these networks can be used to communicate between guest systems and between the guest systems and the host.

    Creating your first virtual machine

    To start creating a new virtual machine, press the button at the top left of the main form:

    <figure class="wp-block-image"></figure>

    The first step of the wizard requires the installation mode. You can choose between a local installation media, network boot / installation or an existing virtual disk import:

    <figure class="wp-block-image"></figure>

    Choosing the local installation media the next step will require the ISO image path:

    <figure class="wp-block-image"><figcaption>
    </figcaption></figure>

    The subsequent two steps will allow you to size the CPU, memory and disk of the new virtual machine. The last step will ask you to choose network preferences: choose the default network if you want the virtual machine to be separated from the outside world by a NAT, or bridged if you want it to be reachable from the outside. Note that if you choose bridged the virtual machine cannot communicate with the host machine.

    Check “Customize configuration before install” if you want to review or change the configuration before starting the setup:

    <figure class="wp-block-image"></figure>

    The virtual machine configuration form allows you to review and modify the hardware configuration. You can add disks, network interfaces, change boot options and so on. Press “Begin installation” when satisfied:

    <figure class="wp-block-image"></figure>

    At this point you will be redirected to the console where to proceed with the installation of the operating system. Once the operation is complete, you will have the working virtual machine that you can access from the console:

    <figure class="wp-block-image"></figure>

    The virtual machine just created will appear in the list of the main form, where you will also have a graph of the CPU and memory occupation:

    <figure class="wp-block-image"></figure>

    libvirt and virt-manager is a powerful tool that allows great customization to your virtual machines with enterprise level management. If something even simpler is desired, note that Fedora Workstation comes with GNOME Boxes pre-installed and can be sufficient for basic virtualization needs.

    Fedora Magazine: Contribute at the Fedora Test Week for kernel 5.2

    $
    0
    0

    The kernel team is working on final integration for kernel 5.1. This version was just recently released, and will arrive soon in Fedora. This version has many security fixes included. As a result, the Fedora kernel and QA teams have organized a test week from Monday, Jul 22, 2019 through Monday, Jul 29, 2019. Refer to the wiki page for links to the test images you’ll need to participate. Read below for details.

    How does a test week work?

    A test day/week is an event where anyone can help make sure changes in Fedora work well in an upcoming release. Fedora community members often participate, and the public is welcome at these events. If you’ve never contributed before, this is a perfect way to get started.

    To contribute, you only need to be able to do the following things:

    • Download test materials, which include some large files
    • Read and follow directions step by step

    The wiki page for the kernel test day has a lot of good information on what and how to test. After you’ve done some testing, you can log your results in the test day web application. If you’re available on or around the day of the event, please do some testing and report your results.

    Happy testing, and we hope to see you on test day.

    Mat Booth: The State of Java in Flathub

    $
    0
    0

    What's the deal with Java in Flathub?

    Viewing all 29894 articles
    Browse latest View live


    <script src="https://jsc.adskeeper.com/r/s/rssing.com.1596347.js" async> </script>